Shopify filters are essential tools that help customers find exactly what they’re looking for among a sea of options. Whether you’re narrowing down payment methods or picking out a few favourite shirts from a large collection, filters make it easier to sift through choices and focus on what matters most.
The goal of filter design of a Shopify website is to make this process quick and easy. Instead of scrolling endlessly through options, filters help users quickly zero in on what they want. This is crucial for a smooth Shopify shopping experience.
As a marketing manager, CEO, or founder, you likely already have filters on your Shopify website. But are they UX friendly? In this article, we’ll walk you through how to check your current filters, understand the best practices, and know what to do next.
Filtering is not a simple thing
Filters are a common feature on websites.
It comes in many types—like pricing, ratings, colors, dates, times, size, and brand. Each type needs the right buttons, dropdowns, or sliders so it’s easy to use. They should work well on big computer screens and small phone screens, so everyone can use them easily.
Filters can be turned on, off, or grayed out. They should start in a way that makes sense, so people aren’t confused. Some filters depend on others. If you pick one thing, it might change what else you can pick. It’s important to show these relationships clearly.
Things like dates or times need to be checked to make sure they’re right. If you make a mistake, the website should tell you clearly how to fix it. When you use filters, they change what you see on the screen. The website should show these changes quickly so you don’t have to wait.
The filters checklist for your shopify
Shopify has a filter feature already, but let’s go through this list to check whether it is missing something or needs to improve.
Does the filter have all the basic options?
- Do you have key filters like price, ratings, color, size, and brand?
- Are there any missing filters that customers frequently need?
Is it easy to use?
- Are filters easy to locate on both desktop and mobile devices?
- Can users quickly understand how to apply and remove filters?
How is the logic of the filter?
- Do filters appear in a sequence that makes sense (e.g., selecting a category before brand)?
- Are any filters dependent on others, and is this dependency clear to users?
Is it able to handle feedback and error?
- Does the website provide immediate feedback when filters are applied (e.g., showing the number of matching products)?
- Are errors or invalid filter entries clearly communicated to users?
- Can users easily correct any mistakes or invalid entries?
Have you checked the mobile-friendly of the filters?
- Are filters usable on small screens without excessive scrolling or zooming?
- Do filters retain usability across different mobile devices and screen sizes?
Does filters affect speed performance?
- Does the site respond quickly when filters are applied or removed?
- Are there any noticeable delays that could frustrate users?
How to check current filters?
Here are some tools that can help you evaluate and improve your filters, along with information on pricing and how they help.
UserTesting
This tool has custom pricing for different needs. It allows you to get feedback from real users on how they interact with your filters. You’ll see where they get stuck or confused, helping you fix any issues.
Hotjar
Hotjar offers a free plan with basic features. Paid plans start at $32 per month. It provides insights into how users interact with your filters through heatmaps, session recordings, and feedback surveys. This helps you understand what’s working and what isn’t.
Lucidchart
Lucidchart has a free plan with limited features. Paid plans start at $7.95 per month. Use it to create diagrams that show how your filters are set up and connected. This helps you see if the filter options make sense and if there are any confusing parts.
Miro
Miro has a free plan with basic features. Paid plans start at $8 per month. It lets you create visual boards to organize and brainstorm ideas with your team. You can use it to map out your filter setup and see how different options fit together.
BrowserStack
BrowserStack starts at $29 per month, with a free trial available. It lets you test how your filters work on different devices and browsers to ensure they look and function correctly everywhere. This helps prevent issues for users on various devices.
Best practices to design an easy-to-use filter for Shopify website
You don’t need to know all the technical stuff, but having a basic understanding of how to design filters can be very helpful. This will help you talk to your design team more effectively and give you a clear idea of what changes need to be made. Here are some simple tips to make your filters better and easier for customers to use.
Designing for easy browsing
Filters help customers narrow down a large number of products to a manageable and relevant selection. Whether it’s finding a few specific payment slips or selecting a few blouses from an entire collection, filters guide users to their desired items.
Customers use filters to communicate their preferences and intentions to the website. The design should make it quick and easy for users to move from having no filters selected to having all the filters they need. This efficiency is key for a smooth shopping experience.
Applying filters is simple, but showing the right amount of relevant results can be tricky. Each type of product and user expectation has a “comfortable range” of results they can easily manage. The goal is to show users enough relevant options that they can understand and choose from without feeling overwhelmed.
Filters create strict limits on the results, unlike sorting, which just reorders them. Too few filters and users are overwhelmed; too many, and they get no results and might leave the site.
To get the right amount of results, remove any obstacles in the user’s path. This can be challenging, especially with lots of filters on different devices.
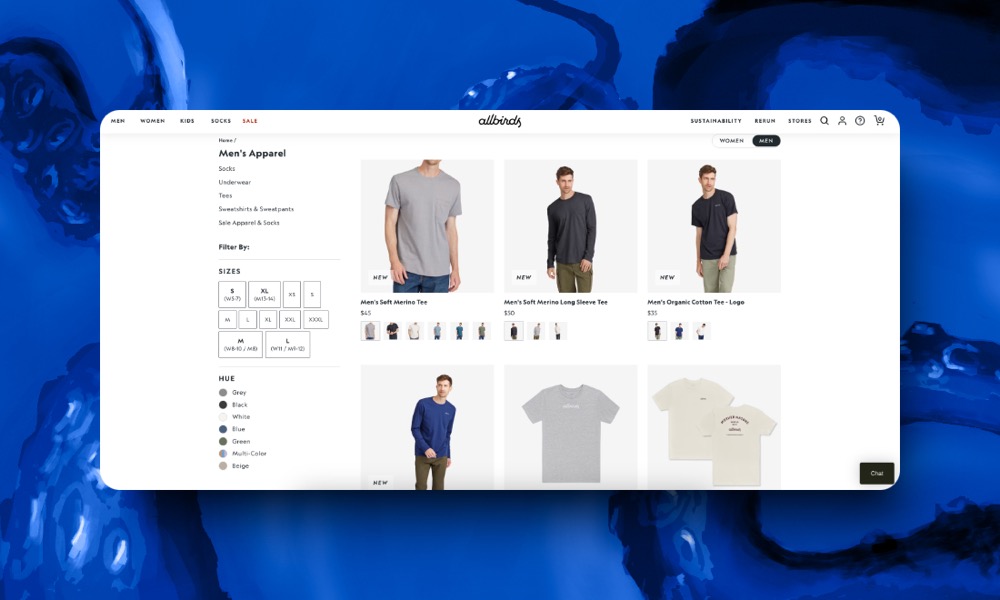
(simple, clean and easy to use filter from Allbirds)
Avoid tiny scrollable panes
A common frustration is dealing with long lists of filter options in small scrollable panes, which only show a few options at a time. This requires users to scroll a lot, which can be difficult, especially on mobile devices.

(The filter of Inkbox shows a limited number of options at a time, requiring clicking and scrolling to see more)
Instead of small scrollable panes:
- Use expandable sections (accordions) that show more options at once. This way, users don’t have to scroll as much.
- Add a search feature within the filters to help users find specific options quickly.
- Provide an alphabetical view for filters with many options, like “Brands,” and highlight popular choices at the top.
Always provide text input options for sliders
Sliders are great for quickly exploring a range of options, like price or trip duration. However, they can be frustrating for setting precise values.
To improve sliders:
- Include plus/minus buttons for fine-tuning values.
- Always provide text input fields so users can enter exact numbers.
Don’t auto-scroll users after each input
Auto-scrolling to the top of the filter area after each input can be annoying and confusing. It disrupts the browsing experience.
To avoid this:
- Let users select multiple filters without being auto-scrolled.
- Provide clear feedback when filters are applied, like a loading indicator.
Don’t freeze the UI after each input
Freezing the interface after each filter input slows down the process and can be frustrating.
Instead:
- Allow users to interact with filters without freezing the UI.
- Use asynchronous updates to apply filters in the background.
- Offer an “Apply” button so users can select all their filters before applying them.
Always show results asynchronously
To enhance the filtering experience, show filters and results separately. This way, results update dynamically without refreshing the entire page.
To do this:
- Render filters and results as separate components.
- Show updated results immediately as users apply filters.
- Use visual cues like loading indicators to show that new results are being loaded.
Minimise layout shifts when using filters
Unexpected layout shifts can disrupt the browsing flow. To prevent this:
- Keep filter sections open after users set new filters.
- Retain filter settings upon page refresh or navigation.
- Disable unavailable filters instead of hiding them automatically, and explain why they are disabled.
Display filters above the results
Keep the filtering area consistent by displaying applied filters above the product results.
To implement this:
- Position filters above the results so users can easily review and modify their selections.
- Use collapsible or toggle options to reduce clutter.
- Consider overlay filters that appear above the results or floating filters that stay accessible as users scroll.
Show the number of results on the “Apply” button
Displaying the number of results on the “Apply” button gives users immediate feedback on how their filter selections impact the product results.
To do this:
- Show the number of results each time a filter is applied.
- Pair real-time updates with an “Apply” button to keep filter options accessible for further adjustments.
Considerations for small screens and slow connections
Filtering on small screens and slow connections can be challenging. To optimise for these scenarios:
- Use asynchronous updates to keep the UI responsive.
- Consider full-page overlays for filters on small screens to allow more flexibility.
- Use a sticky “Apply” button that shows the number of products as a label and stays accessible as users scroll.
Knowing what to do next
After evaluating your current filters and understanding the best practices, it’s time to take action.
Start by briefing your designer. If you find that changes are needed, prepare a detailed brief outlining the specific issues and the best practices you’ve identified. Include examples of well-designed filters to guide them in making improvements.
Next, conduct extra research to gather feedback on the current filter experience. Use tools like heatmaps and session recordings to observe how users interact with the filters. This data will help you understand what works well and what needs to be adjusted.
Finally, collaborate with your web development team to implement the necessary changes. Focus on the fixes that will have the most significant impact on improving user experience. Prioritize these changes to ensure your filters become more user-friendly and effective.
Conclusion
In summary, designing easy-to-use filters on your Shopify website is essential for helping customers find exactly what they’re looking for quickly. You can take note of one of these best practices and apply to your current Shopify site. If you have any questions, contact Kahunam experts.
